WHAT YOU NEED TO PLAY!
In order to play IRONDIE you need to select 9 dice of any shape and color. You
need AT LEAST one die per
Class chosen from the
Attack,
Defense
and
Life classes.
For example, you will be able to play with one
Attack die, one
Defense
die and seven
Life dice or any other combination which includes at least
one die per
Class.
You also need a “game board” (you can download one for free from the web site or
you use the one included in the
Basic blister). You can use any flat
surface as a playing area, but note that the dice are particularly heavy. A
heavy table cloth or some form of protection should be used on fine wood or
glass surfaces.
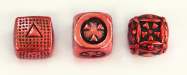
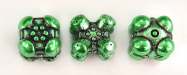
The dice have their numbers expressed with different symbols:
|
Triangles for the Attack dice
|
|
Dots for the Defense dice
|

|
Figures for the Life dice
|
There are 9 different
Types of dice. The dice
Type can be
distinguished by its shape.
Each shape or
Type has particular powers which you will use in the
Skirmish phase.
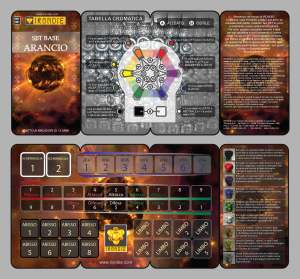
If you have a “red”
Basic blister, for example, you will have all nine
types of red dice available (three per class, that is, 3
Attack, 3
Defense and 3
Life) capable of performing all of the basic IRONDIE
tactics.
With any basic blister you will immediately be able to play against an opponent.
You can be competitive right away, but later you can add specialized dice to
improve your strategies.
GAME OBJECTIVES
The objective of the game is to defeat your opponent by leaving him or her with no Life dice in play.
When, at any moment of a game, a player has no Life dice left into play, that player loses the game.
TURNS AND PHASES
IRONDIE is a game which progresses by player turns, where each turn consists of 3
phases:
- a Battle phase
- a Skirmish phase
- a Damage Assessment phase
During the
Battle phase both players simultaneously cast selected dice
into Battle. Among them there must be at least one
Life dice or the player is immediately defeated (Remember, having no Life dice in play means you lose the game!).
During the subsequent
Skirmish phase players can cast (in turn) the remaining
dice kept in
Reserve (in one’s hand). At this time a player can take
advantage of any specific dice
effects, which is summarized on the
Game board.
During the
Skirmish phase players take turns declaring
Duels. They
do so throwing a dice and declaring a
target dice (chosen from the
player’s own dice or those of the opponent).
If the dice cast during a
Duel obtains a higher value than the target
die, his
effect must be applied.
Each Duel consists of
two subsequent casts for each player.
Player “A” casts a dice, player “B” can counter back, “A” can further counter,
and finally “B” can make a last move.
The
Skirmish phase, maybe the most complex part of all IRONDIE, is
explained in a more detail in the Manual.
During the final phase, called
Damage Assessment, each player subtracts
the sum of his or her
Defense dice from the sum of his or her opponent’s
Attack dice. If the result is a positive number, the player who has
received the damage must subtract it, distributing the damage as he or she
pleases, from his or her
Life dice (for example, if the sum of your
Attack dice is 9 and that of your opponent’s
Defense dice is 4, you
will inflict 9-4 =5, or 5 damage points).
When the points of a
Life die are reduced to zero, that die is declared
destroyed and must be put into the
Abyss!
THE DICE
The dice come in three
Classes (
Attack,
Defense and
Life),
in nine
Types, and in 8 different
Colors.
Every color is usually specialized in one of 9 effects which creates many
possible playing combinations.
|
For example, Black is connected with the Smasher, a very powerful die
which can be dangerous also to its owner. A player who wants to make the most of
a Smasher will privilege a black dice, even if this will make his or her game
more predictable and cause some disadvantages in the composition of the Set.
|

|
The colors are:
- Primary colors: Red, Yellow and Blue;
- Secondary colors: Purple, Orange and Green;
- Non-colors: White and Black.
THE PLAYING ZONES AND THE GAMEBOARD
|
To keep track of player moves and to avoid misunderstandings or tricks, there is
a Game board (“carpet”) included in every Basic blister.
It can also be downloaded and printed from the web site.
Expert players can do without the Game board as long as they arrange
their dice neatly, as if they were playing on the Game board itself.
The Game board must be used in tournaments. If possible, it is
recommended to use it in every game, and a player can always request that his or
her opponent use the Game board.
|
The
Game board illustrates the playing zones:
Battle (composed of
Attack,
Defense and
Life zones),
Abyss,
Limbo
and
Skirmish.
The
Attack,
Defense and
Life dice are placed respectively
into the
Attack,
Defense and
Life zones as soon as they
have been cast into
Battle at the beginning of the turn.
Those dice which have been destroyed and cannot be used for the rest of the game
(defeated Life dice or those dice destroyed by a Smasher, for example) are to be
put into the
Abyss.
All dice in the
Skirmish zone at the end of each
Duel (unless
destroyed) and all dice in the
Attack and
Defense zone at the end
of each turn are to be put into
Limbo.
Finally players keep track of the dice used in the
Skirmish phase by
placing them in the
Skirmish zone.
DRAW
When the confrontation between one die and its target during a
Duel ends
in a draw, the target die wins; in other words, a dice cast during a
Duel
must obtain a higher value than the target die in order to win the
Duel
and apply his
Effect.
This is true as long as the rules of “
Specialization” are followed, as
will be explained further in the text.
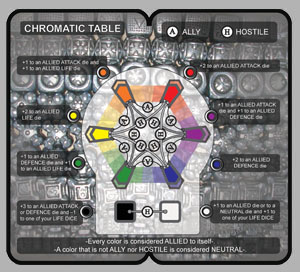
ANTAGONISM (HOSTILE, ALLIED AND NEUTRAL DICE)
Colors are divided into 3 Categories: Primary colors (Red, Yellow
and Blue), Secondary colors (Purple, Orange and Green) and Non-colors
(White and Black).
The Categories define the relationship between the Colors.
According to color theory, Colors are related to each other according to
a “degree of kindred”: two Primary colors are the “parent” colors of a
Secondary, and a Secondary color is the “child” of two Primaries.
For example, Red and Blue are the parent colors of Purple,
Green is the child of Yellow and Blue.
Black and White have no degree of kindred with any other Colors.
According to their relationship, there are Allied colors (as the parent
colors to their children and vice versa), and colors which are Hostile to
one another (as the colors within the same category: Red is Hostile to Yellow
and Blue, Orange is Hostile to Green and Purple, Black is Hostile to White) and
finally there are colors which are Neutral to each other (as are those
colors which are not Allied nor Hostile to one another like, for example, Yellow
and Purple).
|
|
The best way to get used to this idea is to turn to the Chromatic table
which illustrates this concept that might already be familiar to those who have
a background in art, graphics or photography.
|

Every time a die throw scores “1” it generates a particular effect, related to
its color.
Every time a die throw scores “1” the effect generated by its color (according
to what is stated in the
Chromatic table on the back of the
Game board)
must be applied, whenever possible, to any
Allied die (but
never to
itself).
This rule, called the
“1 rule” has to be applied as soon as the die is
cast on the
Game board and before any other
Effect (for example a
die cast during the
Skirmish phase).
For example: I cast a
Red die and score 1.
The
Chromatic table shows that I can give a two-point bonus to one of my
Allied Attack dice, so if I have another Red, Purple or Orange die in my
Attack zone, I can add 2 points to its value.
Consider that in
Expansion Sticks you might also find some
Rare
dice, which apply this rule even when the die scores 2!
SPECIALIZATION
Besides the effects of the “1 rule”, each
Color has a
Specialization related to the die
Type (defined by the dice shape).
You can determine the
Specialization for a particular die color with the
table on the
Game board.
The table has a summary of types and effects. As you can see Black is
“specialized” as
Smasher, Red as
Assault and so on.
A specialized die (that is a die with the best color-type combination: a Black
Smasher, a Red Assault, etc.) breaks the draw rule defined in the Skirmish phase
instructions. This means that
whenever a Specialized die targets another die,
it wins when there is a draw from the roll. For example: a Black Smasher
targeting a Yellow die wins even if it rolls the same value as its target die;
this can happen because Black is specialized as Smasher. The
Specialization
rule has an exception: it doesn’t apply while targeting a
Hostile die. To
be clear, here is another example: a Black Smasher targeting a White die loses
when there is a draw from the roll because White is Hostile to Black.